
How To Use A Checkering File
Tool Time Tuesday Checkering File A Great Tool For Knife Making Knife Making Things To Sell Knife

Joalheria Navajo Teaching Jewelry Jewelry Tutorials Jewelry Tools

Pin On Techniques


Uxcell Red Plastic Grip Metal Shank Checkering Needle Files Woodworking Tool 10 Piece 140mm Long You Can Get Even M Woodworking Tools Needle File Woodworking

Gunsmithing Tools Woodworking Gunsmithing
It is essential these initial lines be straight that is parallel with the edge of the rule.
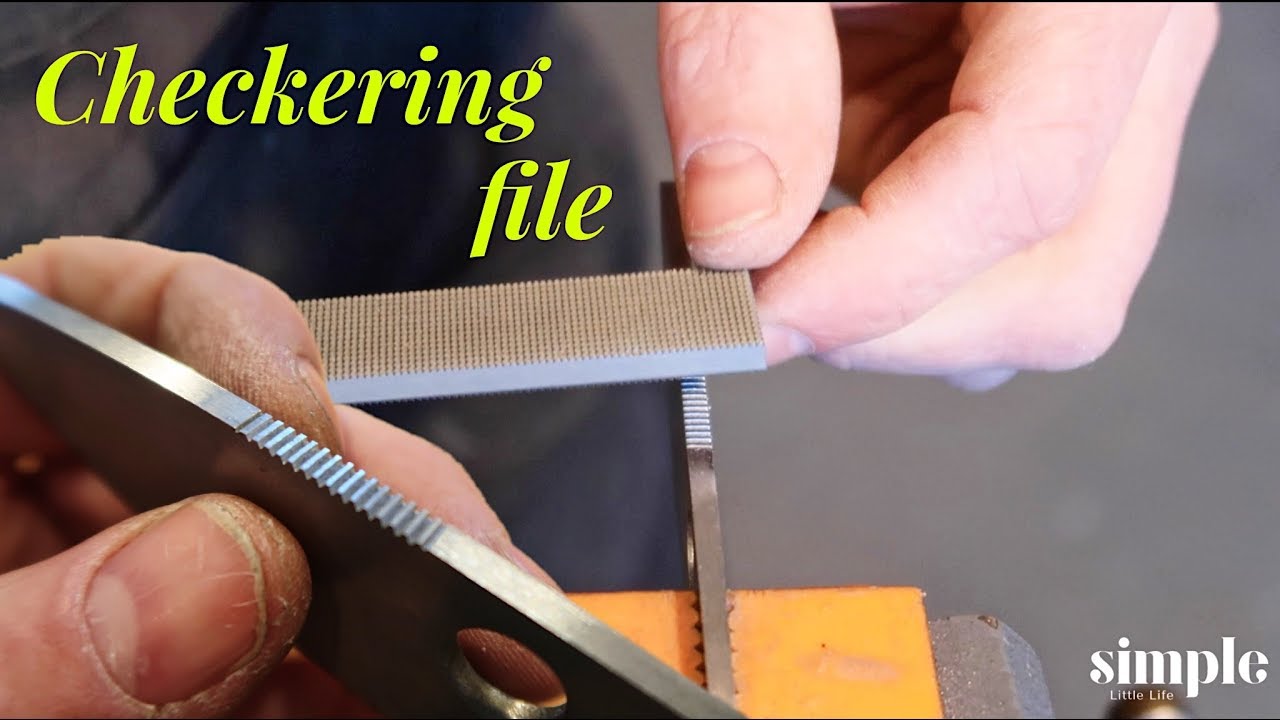
How to use a checkering file. It costs less than 10 and is simply a diamond shaped template 3 long by 1 high for a 3-to-1 ratio or 4 long by 1 high for a 4-to-1 ratio. After pencil tracing use a sharp grease pencil to darken the lines. Almost all sources I have read say that the first step to perform is a horizontal line at the top of the frontstrap where vertical lines will stop then file the vertical lines at about half depth using a jig to guide the file straight then start with the horizontals using a different jig.
Once youre finished with that use the single cutter to even things out deepen lines sharpen diamond points etc. Lay the Checkering File on the metal surface and slide it sideways until one row of teeth catches in the master guide line. Parallel in width and gently tapered in thickness.
Now score the master lines with help of flexible rule and scribe. Easier to use for the less experienced user also. You cost may vary depnding on what materials you might already have laying aoru.
Overcut is parallel to. Because of the arrangement of teeth checkering files sometimes referred to as texturing or Florentine files create grooves or serrations in the material being filed. Depending on how round the handle is you might have to use a file with a single row of teeth.
Cutters are more for new checkering. Save money and build your own cradle. The gunstock checkering tutorial series continues.
This will keep the lines evenly spaced and consistent. 11 rows Checkering files are parallel in width and gently tapered in thickness. Once the pattern is fully laid out bring to final depth with a 60 needle file.

Pin On Files 178974

Pin On Products

Pin On Miniaturetools Made By Paul Hamler

13 Pack Wood Carving Kit 12pcs Wood Carving Tools Sk2 Carbon Steel 1pcs Whetstonesa For Rubber Small Pumpkin Wood Carving Tools Carving Tools Small Pumpkins

Akhavan Insolence The Gemology Project Diagram Design Jewel Drawing Diagram

Rotary Jig Software Tutorial Using 3d Modeling Tools 3d Model Jig Layout

Pin On Armas Caseiras

Pin On Files 178974

Pin On Files 178974

Pin On The Kalashnikov Kollection


Pin On Metalworking Tools

Pin On Files 178974
